Quantcast
Channel: Sarah Gardner {ART BLOG}
Viewing all 185 articles
Browse latest View live

Morning

$
0
0
Nov12-05

Nov12-01Hazy

Nov12-03

Nov12-04Hazy


I really needed to get outside, away from the hum of my computer, the stuffiness of the heating and away from the inevitability of being seated! I wanted to feel the soft cold ground underfoot and breathe in the cool clean air. I wanted to give my mind an hours break in which to think of nothing more than the very moment in which I walked. As a creative individual my mind always seems ahead of me, in pursuit of the next project. Conjuring up visions of ideas, outcomes, processes and methods. One step leads to another and onwardly my mind races ahead to the next possibility. It can be exhausting and overwhelming, and unfortunately it can leave me feeling very unsatisfied and disconnected from my successes. Its so important that I make time to just 'be' and accept where I am and have gratitude for all that I've achieved before racing forwards with the next project.  Finding balance, helps me stay grounded, it helps me slow down and gives me the permission I need to stop,take a look around me, and gain renewed strength. This morning was perfect for just such a 'balancing' walk. My father and I walked from his house out down to the canals edge, the light was muted and the air hug with damp. It was cold and wet underfoot and together we took our cameras stopping every few steps to look at familiar sights transformed by the mist to tranquil places of solitude and reflection.


Nov12-02Hazy

Processed with Someday & Retro Summer from my Photoshop Actions available 2013.


Light

$
0
0
Just a single blade of grass can be as magnificent as the worlds most precious jewels, look, see, open your eyes, beauty is free. Sx

morning light

Lightplay

$
0
0
Light Fantastic-02
Light Fantastic-04
Light Fantastic-03
Light Fantastic-01

Just wanted to share a few more of these {Mini Landscapes}. Taken at the bottom of the garden on a very frosty morning. I just adore the quality of the light and the reflections shadows and light pay amongst the beads of icy and the low mornings sun. Mini blissfulness.

Processed with Daydream Photoshop Action (released 2013)  

Open your eyes

$
0
0
Icyheart

"Open your eyes and you will see love is everywhere"

I was having one of those special one to one moments with my daughter at the weekend as we were in the car driving across town to buy a Christmas present from her to her brother. I'm not sure how the conversation started but I will never forget how it ended. I asked "so what's it like being you, is it okay? Which part of your body do you like the most?" This was her reply..."hum...my heart!" I asked why and she said "because it's where all my love comes from!" 

This was one of those moments, as a parent, I felt pretty proud. I'm not making this up, she said it, and meant it, and wondered why I was so surprised at her answer! I love children's perspective on live its so simple and truthful...

Have a great Christmas.Sxx

Happy Holiday ~ Seasonal Promotion

$
0
0
Christmas Stamps

SEASONAL GIFT ~ FOUR FREE VINTAGE INK STAMPS PLUS 25% DISCOUNT CODE

These delightful 1920's Vintage Ink Stamps are so simple, easy and effective to use. Simply copy onto your design work or photograph and change the Blend Mode from Normal to Multiply (this will remove the white background). Resize and position according to your requirements, done...!

Christmas Stamps 2

OFFER NOW CLOSED

Promotion in conjunction with Sarah Gardner Photography & Beyond the Camera Magazine. 
FIND US ON FACEBOOK 

logo lable darksm


JUST LAUNCHED Beyond the Camera Magazine

$
0
0


After months of hard work, collaborations and determination (mainly to recover from the flu as fast as possible) I'm so utterly proud to introduce you to my NEW online magazine, Beyond the Camera.

Beyond the Camera's first issue went live on Friday and has, over its first weekend, received over 14,000 visits. Feedback from both the public, and the magazines contributors, has been nothing short of amazing.  I would like to take this opportunity to thank everyone so far for their support. The magazine and its creation has meant a great deal to me and has been a project I've simply loved undertaking. To create a visual destination, filled with beautiful works, that inspires others to take action has channeled my own desire to share and serve the very community that supported me when I first started out.  Take a moment to have a look and please share a comment or two. Sx

Scratching the Surface..

$
0
0


Beyond the Camera Magazine launched just a week ago today.The magazine is no longer just an idea, it's now a reality and more importantly an opportunity for me to showcase some of the amazingly talented photographers I have looked towards for inspiration.  My vision for the magazine was clear, I wanted to give back 'inspiration' to other photographers to embrace, share and be uplifted and motivated by. Being inspired into action is like being given clean vitalising air to breath. It fills you with an uplifting sense of well-being and passion. If I hadn't been inspired by digital pphotography and textures I simply wowouldn't be where I am today. Striving to create the quality, and visual appeal, I sought for in my work wasn't easy! If fact at times the frustrations seemed to much to bare. But at those times, I would digress onto the Internet, search for inspiration and would once again feel driven and motivated to continue.   

The magazines success in its first week has been amazing. The wonderful comments, feedback and readership levels have given me back the tremendous satisfaction in knowing 'I got it right'!  I've done my contributors proud, given value to my readers, raised the bar, and intrigued over 40'000 individuals to take a peek. 

If you haven't taken a look yet, or downloaded a copy, use this link below. 

BEYOND THE CAMERA MAGAZINE 


SCRATCHING THE SURFACE 
Also be sure to read my article about working with digital textures and my new book ART BEYOND THE LENS.


Spring


{Love}

$
0
0
Valentines


It's been a tremendous four weeks! The magazines first issue soared its way, above and beyond, its estimated target. Still climbing at now over 77k views it's well and truly made its markJust two weeks after launching I decided to pull out all the stops and bring you even more inspiration!  Our Valentines LOOK BOOK Edition is now here!  You'll see it's most definitely all about the photography, with minimal written material, (but don't worry this style won't replace all those valuable interviews and content from the next full issue!  

When I approached Elizabeth Messina (Kiss the Groom) and Christine and Vania (Simply Bloom Photography LLC) I was ecstatic they agreed to contribute work to the magazine. Elizabeth hand picked a beautiful selection of her favourite romantic images whilst Christine sent over their stunning Valentines themed shoot. It's so nice (and refreshing) to work with openly friendly, amazingly talented, photographers and be in the position to showcase their work together.  There was also a massive response to our facebook Photo Call. It was almost impossible to select who to pick to join us for this edition, but sadly we had to!  We selected Linzie Russo, Valerie Hart and Elisa Russo (no relation to each other), to showcase their Valentines themed work. All completely different from each other in style. Whilst Linzies style is clean and fresh, Elisa's contrasts that with a subtle vintage elegance. Finally Valerie's children's photography made us smile so much we had to invite her to join us. As a mum myself I could most certainly identify with the these little almightly personalities!


Every contributor has been amazing to work with! Without them, and their incredible beautiful work, there would'nt be a magazine, so I thank you them all. As for me, its a bit of a break for now, kiddies are off school next week for half term and at the end of the month my sister and her family emigrate to Australia!  After spending so much time in the presence of amazing work I feel the need to get stuck into a few photographic projects myself next month before knuckling down to April's edition. Sx 

Please refer to the magazine itself for all contributors works, links and informtion. 

PREVIEW of NEW {BEYOND THE LENS} Photoshop Actions

$
0
0
Spring Joy 9

Five years of experience, brought together in one amazing set of Photoshop Actions.

BEYOND THE LENS {Photoshop Actions}
Straight from the pages of my book, {Art Beyond the Lens} my processing methods and techniques finally come together to create this amazing collection of Workflow and Creative Actions. Designed from the processing knowledge I've established over the past five years these Actions will soon be available for you to purchase and use to enhance your own beautiful fine art and portrait photography. From the initial processing Workflow steps that create clean and refined definition to 22 beautifully designed Creative Actions, Light Fill Actions and 4 B&W Conversions Action, between them they provide hundreds of creative combinations. Play the Creative Actions over the B&W Conversions Actions to create an amazing 88 individual tonal variations. Play and layer together the Creative Actions to give you beautiful results from fresh and zesty to soft dreamy and hazy...create your own favourite combinations of beautiful with {Beyond the Lens} Actions from Sarah Gardner Photography.

Take a peek at what will be included...

2 Pre Processing Workflow Actions{with Batch processing versions included}
2 ProTEC Workflow Actions for bright clean processing with Highlight protection built in.
2 ProMATT Workflow Actions with a softer contrast output specifically designed for progressing onto working with Textures.

22 Creative Actions
6 Light Fill Actions
4 B&W Conversion Actions
12 Rescue Actions

Totalling 50 Actions {yielding hundreds of creative combinations}


LETS TAKE ONE PUNCH OR RANUNCULUS
{ProMATT ICE} with Joy & Melody 

Spring Joy

{ProTEC I} with La Rosa & North Light

Spring Joy 4

{ProTEC II} with Portobello & Joy

Spring Joy 1

{ProTEC I} St Marie & Barkley Rd

Spring Joy 3

{ProMATT ICE} with Summer & Melody 

Spring Joy 5

{Beyond the Lens} Photoshop Actions will be launching next week, with specific before & after examples plus a video demo in how to work with the Workflow and Creative Actions to achieve the results you aspire to every time.

These Actions have been designed to give you the Photoshop tools I use everyday and have therefore been designed using my preferred Photographic processing software. {Available for Photoshop CS3-6 only}

NEW Actions {Giveaway Registration}

$
0
0
{Update: Congratulations to number 36 Julia Bedingfield}
 
GO BEYOND THE LENS & STYLE YOUR OWN ART

This week I'll be launching my much anticipated NEW Photoshop Actions, so let's have some fun with a FREE giveaway! {NOW CLOSED}

Simply leave a comment in the Facebook Comments Box for the chance to win a complete bundled collection of Beyond the Lens Photoshop Actions plus Beyond the Lens Texture Collection.(Please note the Actions are for Photoshop CS3 - CS6 only no cash alternative)

Registration closes on 6th March 2013 8pm GMT. Random.org will select a winner and you'll be contacted via your Facebook Page.

Cover 2

Launched {NEW ACTIONS}

$
0
0
Cover3


STYLING THE CREATIVE...
Beyond the Lens Actions provide a complete one stop collection. Strong enough to use with florals yet delicate enough for portraiture. Soft and tonal for Textures and perfectly balanced for creating natural skin tones. From fresh and bright Workflow Actions to delicate pastel tones, Beyond the Lens Actions yield beautiful results time and time again.


Software Requirements:
Compatible with Photoshop CS3 / CS4 / CS5 & CS6

Includes:
2 Batch & Pre Processing Actions

4 Workflow Actions
ProTEC 1 & Pro TEC II
ProMATT ICE & ProMATT WARM

17 Rescue Actions
including 8 {Paint on} Actions for Skin 

23 Creative Actions
Barbican
Barkley Rd
Brompton
ChinaWhite
Journey 
Joy 
La Rosa
London 
Melody 
Noon
North Light
Nottingham
Parisian
Pennylane
Portobello
Retroplay
Riverea
Someday
Southernbell
St Marie
Summer 
Sway
Urban Prairie

7 Light Fill Actions
Blossom
Dreamer
Mistymay
Rainfall
Rosedelight
Rosie
Skyfall

4 B&W Conversion Actions
35 Film
Press Print
Westside
Victorianna

$125 USD

 Add to Cart

$25 OFF PROMOTION UNTIL 16th MARCH {Use Code: 89W9OJ1Z}


Lets take a closer look at how they work...

Beyond the Lens Photoshop Actions have been designed from the processing steps I take when editing my own work, they draw on the techniques and insights detailed in my book, Art Beyond the Lens, Chapter 5and offer a standardised method to achieving beautifully reliable results.  Creative processing is an extension of your art so experiment and use different Action combinations depending on the mood and subject  you’re working on. Have fun, be playful and style your creativity. Sarah Gardner


2 PRE PROCESS ACTIONS
PRE PROCESSING
The Pre Processing Actions form the basic foundations to achieving clean and bright results. They work on the very steps described in my book (Chapter 5, pg 79) and are available in two strengths. If all you're after is a subtle lift to your work these Actions will probably be enough and for this reason they have been recorded into two Batch Actions. Batch Actions are for running on entire folders of images automatically, I use them specifically when editing wedding work.

4 WORKFLOW ACTIONS
When working on a smaller collection of images the Workflow Actions provide a greater level of control.

ProTEC {PROCESSING HIGHLIGHT PROTECTION ACTION}
There are two versions of this Workflow Action that will lighten, brighten and open up mid tones without over exposing your original highlights. These actions are designed to give you a standardised starting point and should be applied before proceeding with the Creative Actions.
Understanding the different options, both the ProTEC I {Florals} and the ProTEC II {Portraits} work in the same way, the difference is that the first option is however much stronger and therefore I recommend it for floral and still life images over portraits where skin tones need to be dealt with in a softer way to remain natural looking. These Actions will play to 100% and can be reduced in opacity if the initial effects are too harsh for your preference. 

ProMATT {PROCESSING MATT EFFECT ACTIONS}
These two Workflow Actions have been specifically designed for working with Textures or to provide a very soft tonal effect. If you want to proceed to apply Textures to your image the ProMATT Actions provide a softer result, with a lower contrast yield that’ll allow for the additional contrast that comes from processing with a selection of Textures. Available in two tones, ICE & WARM creating the perfect pre Texture Workflow.

17 RESCUE ACTIONS
The 17 Rescue Actions help with images that even after running the Workflow Actions need some additional attention. There are 8 {Paint on} Actions that have been designed to specifically help with skin toning. Starting with the Skin Highlight Action that can be gentle applied to skin areas to smooth, brighten and tone, reduce shadows and yellowing. Whitelight and Mattblack Wand Actions bring back highlights and blacks where you want them establishing depth and a more natural result. The Blush Burst Action will also add a soft healthy vibrancy to skin. Finally the Color Fade Action can be used to spot correct areas that may have become overly pink or red (this can sometimes occur around the eyes, nose, mouth and ears. Finally add more Definition or Soft Blur where needed. Using the Rescue Actions will give you complete control over your initial process getting your image 'picture perfect' before proceeding onto the Creative Actions.

23 CREATIVE ACTIONS
The Creative Actions play at 50% of their entire strength. This gives you the additional creative control to increase the Actions opacity beyond 50% thus increasing the Actions overall effect. The PLAY ALL CREATIVE Action has been added to the top of this collection as a quick and effective way to familiarise yourself with each Actions defining qualities and effects. Once played this Action, simply plays all the Actions in the Creative section and then disables their results. You can then simply toggle on and off each individual Action to reveal its effects. You can then start to combine different Actions to create the special look you desire.

7 LIGHT FILL AND 4 B&W ACTIONS
Light Fill Actions are designed from Gradient Fills as described in my book, they create the look of additional ‘light’ overlaid from the sides of the image and mimic haze. I have recorded into Actions a few of my favourite versions but they are so easy to create yourself. See Chapter 5, pg108. Black & White Conversion Actions offer an initial starting point from which to build more creativity. 35 Film is the basic Gradient Mapping Conversion I use and detail in Chapter 5 (pg 128). Conversions can often be too light or dark so in the PLAY ALL B&W Actions I’ve added in a couple of the Rescue Actions to give you instant access to being able to add in more light or intensify as you wish.

Finally there are 5 additional Flatten & Finishing Actions that can be used before your final save.

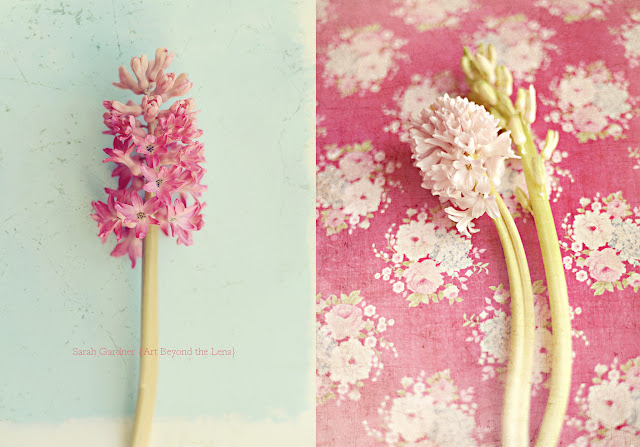
Here are some before & After Examples to help you see just how perfectly balanced and naturel these Actions are. They yield soft workable results that dont overpower your photography. 


WebImages24

WebImages24A

WebImages24B

WebImages20

WebImages20A

WebImages20B

WebImages23

WebImages23A

WebImages17

WebImages17A

WebImages17B

WebImages11

WebImages11A

WebImages11B

WebImages11C

WebImages02

WebImages02A

WebImages01

WebImages01A

WebImages01B

WebImages01C

WebImages09

WebImages09A

WebImages09C

WebImages09B

WebImages22

WebImages22A

WebImages22B

WebImages04

WebImages04B

WebImages04D

WebImages16

WebImages16A

WebImages16B

WebImages21

WebImages21A

WebImages18

WebImages18A

WebImages12

WebImages12A

WebImages12B

WebImages10

WebImages10A

WebImages10E

WebImages10F

WebImages07


WebImages07B

WebImages26

WebImages26A

WebImages26B

WebImages08

WebImages08A

WebImages08C

WebImages13

WebImages13A

WebImages13B


Beyond

Buy with {Beyond the Lens} Texture Collection and save $25

$25 OFF PROMOTION UNTIL 16th MARCH {Use Code: 89W9OJ1Z}


$175 USD

 Add to Cart

Cover

Find out everything there is to know about my work, how I process and work with textures in my book 'Art Beyond the Lens, published by Focal Press 2012.

{GET THE BOOK}

Button large


TERMS OF USE
Sarah Gardner photography cannot be responsible for loss or damage to photographic editing software, equipment or image files as a result of loading or using the Beyond the Lens Action Collection. IT IS YOUR RESPONSIBILITY TO BACK UP YOUR ORIGINAL IMAGES PRIOR TO UNDERTAKING ANY PROCESSING STEPS. These actions have been designed to work with files from both Canon and Nikon. Other digital files from other camera manufactures haven’t formed part of the testing program. ACTIONS tested on Photoshop CS3 to CS6 only. THESE ACTIONS ARE ONLY AVAILABLE FROM SARAH GARDNER PHOTOGRAPHY AND ARE REGISTED AND PROTECTED BY COPYRIGHT LAW. TO COPY IN PART, FULL OR RESELL IS A CRIMINAL OFFENCE. The Beyond the Lens Actions are only available for personal / individual professional use. Training companies, academies, collages and workshop trainers many apply for full endorsement of this product. Please contact Sarah Gardner photography for details at: info@sarahgardnertextures.com


At the end of the week....

Preparing for Summer

$
0
0

BTL-03

If you're at all like me the very last place you'll want to be when the weather finally breaks is sat in front of a computer editing!  Using what I call the 'down' months is perfect for working on new processing skills, sorting out and backing up work, refreshing websites and blogs, and even finishing off some of last years outstanding projects! Because when Spring finally does break, my computer chair will be the only thing left parked in front of my computer 

Looking back to last Summer I found a few images I shot to test my new Nikon D800. The initial images where a little flat and hazy and I was still playing around with settings etc. Now that I've launched my new Photoshop Actions I feel so satisfied that I've created a one-stop-tool for all my editing needs that I refuse to use anything other than my own Actions, and why wouldn't I. 


Although I'm a photographer, I didn't started out that way! To begin with I trained as a Fine Art painter. I studied photography in order to support my work and used film and darkroom techniques to explore processing effects.  Knowing this about me will help you understand how I approach my processing workflow and use of Textures.  Like with painting I want to have the level of control needed to be able to adjust, manipulate or tweak specific areas and zones within my image so working in a 'Layered' format is really important.

To start with I'll scan a composition and know where I want to add in more light or haze, as opposed to where I want to darken add intensity and sharpness. In camera I'll shoot with narrow depths of fields and use structural foregrounds and backgrounds to do this. I may also in processing use Textures to 'lead' the eye and add additional areas of interest.  I require this same level of flexibility with my Actions and I knew as I developed them that I wanted to continue to support a processing methodology that allowed gradual development, smaller steps, layered progression. ie, Actions that could be layered together as well as opened up or masked off.

Actions are like paint brushes, each loaded with a task. From getting the perfect foundation with 6 Workflow Actions to correcting or enhancing specific areas with 17 Rescue Actions. Then adding colour, tints and tones with 23 Creative Actions and 7 Light Fill Actions. Beyond the Lens Photoshop Actions are tools, built from the knowledge and processing skills I've develop to create my own signature style.  


Initially processed in the same way, as these images are very hazy SOOC they only needed the basic of all the Workflow Actions, Pre Process I followed by Rescue Action Intensity to inject a bit of depth back into the image.  From there Creative Action St Marie provides a wonderful warm summery color pop mixed with Light Fills, Blossom and Skyfall.  Finished with add Definition & Paint on Sharpen. (And, yes the fly in the original image, just above her head, was cloned out too!)  The opening image was also processing in the same way with the addition of Creative Action ~ Nottingham to bring a cooler haze to its finish. Final Images have been further processed with Conversion Action 35mm and Creative Action Barbican whilst the last image has been further processed with Creative Action Chinawhite folowed with Rescue tints Vintage and Blush. 


BTL_01


BTC-04


BTC-05

For more information about my Actions and examples go straight to my website or visit previous blog posts.


Goodbye Greens ~ Hello Beautiful Skin

$
0
0
We all love our greens? If you're anything like me you probably spend a great deal of time getting the little ones to love their greens too! I water my lawn in summer to keep it green and I recycle to be green! Yet if there is one color cast I loath when working outdoors, it's GREEN!  

This is a big problem here in England especially in the late Spring and Summer when our greens become almost luminous!  The lush vibrant green green fields of England do not make a great combination with the porcelain skin tones of the English rose complexion! Even with blankets to sit on, reflectors, shade from walls and not trees...grey / green color casts get in on the picture. So what do I do about it? I recall following a tutorial once on how to remove colour casts which took twenty minutes and I almost lost the will to live!  You can try using filters and tweak your white balance to help but these options have an effect on ALL the greens in your image and that may not be an option. I most certainly love the vibrancy of green just not all over the faces of my subjects! 

Actions to the Rescue! (quite literally) 
Within my new Beyond the Lens Photoshop Actions I've included 17 Rescue Actions to help specifically with problem areas just like this one. For this example we are going to look at using the Skin Highlighter.  Before we begin there is a question of how real you like to keep things? Whilst I love to transform my work into little pastel gems, I'm also very mindful of keeping things real. I don't want my subject to end up looking like a plastic manikin, my aim is more to tone away the grey-green color casting and give her a healthier rosier glow.


Step 1 ~ Workflow PreProcess I with Intensity at just 13%.
You can see the grey-green cast around her nose and the central area of her face, (a green cap probably wasn't a great idea either!

Wad_02

Step 2 ~ Rescue Skin Highlighter 
Run this Action and paint~on the effect over her skin only (avoiding the whites of the eyes). 

TIP: If you find the 'tone' is too pale you can darken it down by reduce the opacity slider for the Super Soften Toning adjustment layer within the Action itself. To reduce pink tones further you can also switch off, or reduce, the Luminous Highlight. These tweaks  will help you create the perfect skin tones right for the image you're working on. You'll now see that the grey-green cast is still there but the overall effect is more tonal and less patchy, all the details, like her sweet freckles remain visible. 

TIP: You can also use the Rescue Actions, Blush Burst and Whitelight Wand to paint~on more vibrancy, glow and highlights to cheeks, nose ridge, forehead and lips.

Wad_03


Step 3 ~ Creative Action, La Rosa 50%
To finish I've selected to use Creative Action La Rosa to add vibrancy with a touch of warmth. The grey-green tones have now almost gone. 

TIP: If you're like me stay mindful of not overdoing your processing and retain a little of the difference in her skin tones from her cheeks to her nose and forehead. If these tones where to all be the same she'd look like she was made out of plastic! (and that's never a good thing!)

Wad_04


Stlying the Creative ~ Lets now take this image a little further into pastel prettiness. I can successfully do this because I've warmed her skin tones initially. 

TIP: If I'd jumped straight to this step her face would now be overly white and washed out. Adding in tone and depth at the start is the key to achieving this look. It also helps maintain tonal balance for a final B&W conversion. 
  
Step 4 ~ Light Fill Action Rainfall, Creative Action Southern Bell 60% & Chinawhite 25%

Wad_05

Step 5 ~ Black & White Conversion Action 35 Film.
  
These steps took just a couple of minutes and the more you do them the more you'll see the benefits to be had by paying skin a little more attention from the start of the process. By the time I've now converted this image the entire background is soft and light with the face and eyes the main focus. The tones, slight shadows and freckles on her face are still visible making the image look natural and authentic. 
 

Wad_06

Have a great weekend...and if you haven't yet purchased my NEW Beyond the Lens Photoshop Actions please visit my website store here. Sx

Take a final look at the step by step transformation...
Wad_00


Soft & Delicate

$
0
0
SG_Teacup_1203-060a
SG_Roses_1203-046a


The weather has been so extreme this year. Fresh snow fall this weekend, yet this time last year it was a record high for March with warmth of 23 degrees! Wow, looks like a week of freezing sub zero ice! Perhaps Snow Eggs for Easter this year! Have a great week Sx

Happy Easter Weekend

$
0
0
SG_Teacup_1203-056a

"Come in", I'll say! 
"Pull up a chair and I'll put on the kettle and brew us some tea".
We'll sit by the window and watch clouds go by
 and take a moment to think about our everyday. 
Together, in silence we'll remember our loved ones, both near and far.
Unspoken we are at peace with everyone and everything. 
Today we feel connected and we are eternally thankful. 

Have a great Easter Weekend. Sx

BEYOND THE CAMERA {Issue 3}

$
0
0
I'm so thrilled to introduce you to Beyond the Camera Magazine's 3rd Issue! It's been an amazing process working with such talented photographers and stylists. 

Georgianna Lane has long been an inspiration to me so to include her work, in this issue, is a true delight. Also shooting on location with Malin Ngoie and Bettina Vetter at Hesters Beach themed house was also a wonderful experiance and a lot of fun. Every page is packed with inspiration and we now offer a purchasable PDF download for just $8 {which includes the magazines first free gift! For this issue it's 8 exclusive textures from me!}

Gift artwork 3


Visit Beyond the Camera Magazines website here:


Looking for that fork in the road?

$
0
0
Journey04
Journey01
Journey03

All photography by Sarah Gardner

What comes next I ask? 
Could there be a turning up ahead, a different path, a different outcome?  When I put the 'brakes' on and take a good look around me I get a little concerned that I'm actually in the middle of nowhere! 


Feeling inspired and a little more grounded since returning from Florance. Reading the most amazing book "My Heart Wanders" by Pia Jane Bijkerk  Take a look too....


April Blossom

$
0
0
April Blossom02
April Blossom01

To work without regard for any outcome, other than true self expression, is to have complete creative freedom.


Enjoy Sx 

I love everything their is to love about trees in bloom! I think it's the view point of being underneath them looking up towards the beautiful dappled light of the sky. I justadore the way they sway and dance in the breeze and even when their blossom starts to fade it rains down like pink snowflakes.  They may only last a week or so but trees in bloom are just heaven. 
As a child my grandparents lived on an avenue of cheery trees and in spring the blossom would create the most magnificent display. The street was narrow and the decision was made to widen the road surface to cater for the growing number of cars and the main bus route. The council cut down nearly all the trees in the avenue in order to make way for a wider road. As a child I was really sadened by this heartless distruction of beauty just for the sake of being able to provide car parking! But do you know what? Out of the 30 to 40 trees that lined that road, a few were left untouched! They were the ones outside my grandparents home. A true blessing, I thought so anyway.
 
Processing tip: I've proceesed these images to enhance the pale colour and hues that already existed. I  wanted to pull through the cool light from the overcast day and contrast that against the pretty delicate pinks. When I designed my {Beyond the Lens Photoshop Actions} I wanted to have the tools to be able to specifically enhance hue and tonal gradientsTo create this look I Pre Proceesed with ProTecII and then I ran Creative Actions:Barbican, Sway and North Light (in that order) and tweeked their opactity to achive the tones I was after.  Hope that helps. Sx


Viewing all 185 articles
Browse latest View live